Monday, August 8, 2011

Grits with Callaloo & Tomatoes

Thank god it's that point in the summer where I can eat ripe tomatoes everyday of the week. Yesterday was tomatoes on white bread with mayo, the day before was marinated tomatoes, but today... well today I've got something special.

Today, it's grits with sautéed callaloo and cherry tomatoes.

Grits can be easy, or they can kick you in the ass. I've certainly learned this from experience. I like to use equal parts grits to water in a pot over low heat, but I'll add water as needed, but make sure that you do not look away from those little flecks of corn for more that two minutes or you will be scrubbing the hell out of that pot. I'm not kidding, just watch it like you would a two-year-old in a room full of cleaning products, but unlike the child, stir the grits every few minutes. Do this until you are happy with the consistency. Some like their grits a bit more toothsome, some like 'em real creamy (insert joke here). Just add the water as needed and let the grits simmer until you think they're ready.

Once they're done, or you've said "f it", add a nice size tab of butter, a pinch of salt, and a crack of black pepper. Well that takes care of the grits, now there's more to be done.

For that callaloo... get a pan on medium heat and toss in some diced bacon, or don't, instead you could use a bit of oil or butter, I really don't care, but where there's bacon, there's bacon grease, and when you have bacon grease, you have pan lubrication. That logic seems pretty sound to me.

Alright then.

Your bacon has rendered its fat an lubed the pan all while getting a crisp exterior. Toss in some chopped callalloo and maybe a bit of those wonderful scallions you have sitting in your fridge. Stir it all together and throw a lid on it. Once the leaves are nicely tenderized, kill the heat and lay them across you beautiful bowl of grits.

For the cherry tomatoes, simply quarter them and toss them atop your bowl of grits and greens. They add a wonderful coolness to the hot bowl dish.

So there you have it. Grits with Callaloo & Tomatoes.

Saturday, April 23, 2011

Head

I can only pose the question, why not?

As cute and cuddly as a little piglet may be, it's going to the slaughter in more cases than not and along with its porcine body, chops and all, the heads going with it. So on a recent journey I decided to throw a little piggy into a head lock and throw it in a pot. Head Cheese Time.

One pig head, Cheeks on or off, depending on how much fat you want or if Guanciale is in your future.

A good amount of parsley, carrots, parsnips, salt, pepper, white wine, bay leaf, whatever.

The dog's not part of the equation, but aren't they so darn cute together (insert southern accent).

Try to fit it all in a pot and top it off with water. As you can see, I was ill-equiped in the size department...the pot that is.

If the head doesn't fit...well...find yourself a girl that isn't 15...or a pot larger than 5 gallons. In this case, I just flipped the head halfway through the cooking process, which was about 6 or 7 hours of slow simmering.

Times up? Pull Out!

Let the head cool off a bit and start tearing the meat and fat from the skull. It's pretty obvious whats edible and what isn't...and yes, the eyeballs are edible.

Once you pig head is not resembling Skeletor, you're ready to give all the meat and fat a rough chop or fine chop, however you want the terrine be.


Toss the meaty fat goodness into a plastic lined mold and give it a good pour of that reduced stock you cooked the head in...and yes, you should have reduced the liquid down by half or so and give it a good seasoning, salt and pepper that is.

Set it in the fridge over night and presto. Pig head terrine, or head cheese, or whatever name will get people to eat it.


Wednesday, March 2, 2011

King Oyster Scallops

The other day Q and I went down to Sunset Park's chinatown and grabbed some goodies. We walked into a chaotic market and I practically crapped myself. There, sitting only a few feet from a plastic produce bag nestled tightly in the curls of my fingers, was a whole box of King Oyster Mushrooms. There's something intoxicating about fresh mushrooms, especially when they're not shrink wrapped. Maybe it's the hunter gatherer in me that longs to forage through the pristine woods.

So I picked out two beautiful King Oyster Mushrooms and some Choy Sum (a chinese green).

After making steaks out of Turnips, I decided to continue along on the path of non-meat dishes inspired by those centered around meat. Root Vegetable = Cow Steaks, Big Mushrooms = Scallops.

Now the tops of these here King Oyster Mushrooms don't have to much in common with the appearance of scallops, so chop them the hell off. Do not throw them out. I simply added them to a vegetable stock I was making. I also took the butts of the mushrooms off and tossed them in the stock pot as well.

To create the scallop effect with you mushrooms, just cut the body of the mushroom into scallop size pieces.

To cooke the mushroom scallops, do as you would any scallop. Simply heat a pan with some butter or oil or both, salt and pepper the mushroom segments and sear them to a nice golden brown. To spice it up, I added a bit a miso to the pan with the butter.

Cook the mushrooms for about a couple of minutes a side. Once both sides are nicely browned, add some stock, wine, or whatever liquid your little heart desires, to the pan and toss a cover on the pan. Oh, your cast iron skillet that you've perfectly seasoned over the years doesn't have a lid to go with it. Well use your brain and rig a piece of tin foil to do the job.

After a minute or two, check the mushrooms and give 'em a poke...not that kind of filthy act, more like the kind of poke you would give a steak to test its doneness. If they feel tender and soft, or in other words, not firm, then they are most likely done. Weird... overcooked mushrooms = overcooked scallops, funny how that works. If you don't like your scallops to be like hockey pucks, then I'm sure you don't want your mushrooms to be like hockey pucks.

To bring it all together in its vegetarian glory, I sauteed the Choy Sum with a pieces of Kale I had left over.

This was also accompanied by a puree of roasted yellow carrots and scallions.

There you have it.

Wednesday, February 23, 2011

Steak


What's your favorite steak? A T-bone, NY Strip, Porter House? Last night Q and I had some damn good steaks, but they weren't cow steaks. There was nothing bloody about them, no medium rare or well done bullshit to deal with. These steaks were, how do you say, made as if a cow were put into a drooling vegetable state. They were...(cue in the creepy organ to build anticipation)...Turnips.

Oh shit, no he didn't.

Yes sir, and ma'am, I did. I thought about a contemplative friend, one who's finding their place in our now abstracted food chain, and decided that steaks shouldn't just be meat nor should vegetables only be sides or muddled into stews, soups, or ambiguous blobs. Don't get me wrong. I love vegetable soups, chili, stewed greens, roasted medleys, and almost any vegetable concoction under the sun, but why no, pardon me, masculine vegetable main courses. No one ever says that Porter house looks cute. Shit, it's not cute, it's a hunk of awesome, kick ass, manly meat, even if that sounds gross. Honestly, why not make a nice sized veggie steak that feels like I'm eating a piece of protein.

Breakdown.

1 large turnip cut into thick slabs.

For 2 steaks, marinate with:

a good amount of olive oil
1 tbsp apple cider vinegar
pinch of salt
couple grinds of black pepper
1 tsp coriander
1 tsp each of rosemary & thyme (cue the Simon and Garfunkel)
1 tbsp horseradish mustard
couple dashes of worcestershire sauce

Let them all mingle with the steaks for a while.

Now, how would one prepare such a meaty steak...well, like a regular steak, except there's a little less to worry about. With these here turnip steaks, we're not going to get held up on whether or not they're bloody or medium rare or well done. All you're looking for is a nice golden brown on the outside, preferably with a bit of crispy texture like a crust, and the ability to sink a toothpick into it, but it shouldn't be too easy to sink it in. We don't want mush piles now, these are supposed to be steaks. Think about how sinking your teeth into a piece of meat feels, yea I chose to say it that way, and now think about that when you insert your toothpick into the presumably cooked through turnip.

So get a cast iron skillet with some oil, or butter, or both, and crank the heat up. Pat your turnip steaks dry and prepare to sear. Once the turnip hits the pan, don't move it around too much. You're looking for that nice golden-brown, which should take a few minutes per side.

While you're searing, crank the oven to 350˚-375˚. Flip the turnip, get the proper caramelization on the other side and toss it into the oven. Cook it for about 20-30 minutes or until it is of the texture you envisioned, yes...by using your toothpick.

There you have it. Turnip Steaks.


Wednesday, January 26, 2011

Pork Buns


Tonight...it's pork buns.

Get yourself a damn fine piece of fatty pork belly. Make sure it's of good quality as it is the star of this meal. You want that rich, porky taste, not some wet, flabby pork flavor that tends to be associated with average grocery store pork. Trust me on this, I didn't like pork when I was kid because it came from a shit hole. Did you like those breaded pork chops from childhood? The only good part of those was the overly seasoned bread crumb coating.

My belly came from the Meat Hook here in Williamsburg, Brooklyn. Look at the fatty glory of this belly.

I marinated it overnight in some rice vinegar, miso paste, ginger, soy sauce, Sriracha, brown sugar, and garlic. Remove the skin the next day, but whatever you do, do not, I repeat, DO NOT THROW IT AWAY! You could roast it at a super high temperature and make some crispy roasted pig skin, or braise it, or even dehydrate it and deep fry. Just don't toss it in the trash.

Preheat you oven to 450˚ and then throw your pork belly in a pan with a high wall, I used a dutch oven. Once your oven reaches 450˚, toss it in. Cook it at that temperature for 10-15 minutes.

Give the pork belly a quick basting with its own fat and turn the temperature down to 250˚. Now you must wait. How long? At least 2 hours, but up to 4 or so. Just make sure it doesn't burn.
While you've got your belly in the oven, make some white bread dough. I chose to use pork and duck fat in mine. Let the dough rise and pound it down. I'm not a baker so you may want to get some advise or guidance elsewhere on the whole dough making thingy. I can tell you that once it would be ready for making a loaf of bread, you should tear off some little pieces, roughly the size of a ping pong ball or a silver dollar, and roll them into balls. Let those pieces of dough rise under a towel or plastic wrap for a bit.

Once the balls of dough have risen again, roll them into ovals and grease them up. Fold 'em over and place them on an appropriately sized piece of parchment paper and steam away. Allow the buns to steam for roughly ten minutes.

Open up the buns, slather some Hoisin sauce, a slice of belly, pickled cucumbers, cilantro, scallions, and Sriracha. Enjoy!


Monday, January 24, 2011

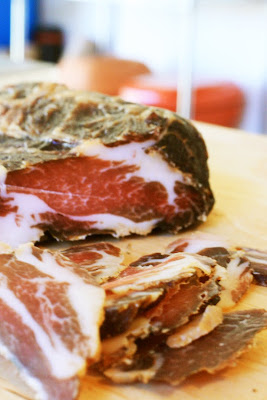
Coppa


I just realized that I never shared my Coppa conclusions with y'all. Well here it is.


Spread some homemade mustard on some white bread and you've got yourself some pork lovin' lunch.


Monday, October 4, 2010

Rat-eh-2-E


It's been a while, but here's some Ratatouille I made back in late spring. 90% of the dish was sourced from within a quarter mile of our apartment in Red Hook.

I built a garden in my courtyard in the waning of winter and transplanted some germinating seeds when it was warm enough for those little weaklings. For this dish, I plucked several eggplants that were the size of a 12-year-old boy's you know what. They were firm, but oh so sweet with a bitterness that just hits the back of the tongue.

The eggplants were sliced into quarter-half inch rounds and then quartered.

The same was done for this beautiful squash grown by Added Value here in Red Hook.

Into a pan with some hot, but not too hot, olive oil, garlic and onion. It's important to get these guys going early on in the process, as they need a bit more time to get tender.

Once the squash and the eggplant have had a few minutes in the pan, toss in some chopped capers and anchovy along with a bit of tomato paste. As much as you may think you hate these fuzzy little fish filets, you don't. In my mind, they are the key to some real complexities and depth found in many great tomato sauces. Don't question the fish, just throw 'em in there.

Radishes and peppers are at the door... let 'em in.

In the case of this Ratatouille, the guests at hand are homegrown watermelon radishes, Jalapenos gone red (in other words they just sat on the vine longer and ripened a bit more), and some of these weird hot peppers my friend gave me.

These peppers are half purple, half white/yellow/green, and only an inch long. On top of that, some are fiery hot while others are sweet and mellow.

Just give all the peppers a good mince and toss them in the mix.

Dealing with watermelon radishes is a bit different in that I didn't just chop the daylights out of them. Radishes, aside from being delicious, are pretty damn sexy, but these watermelon radishes are on a whole different level of visual stimulation. Just look for yourself.

That's why I didn't chop them. Instead, I opted for a clean slice to show off their beauty. Into the pan they go.

Thanks again to Added Value for providing this dish with the sweetest heirloom plum tomatoes. These tomatoes are best for cooking or canning, not eating raw like I did with the rest of the tomatoes I received from my CSA this year. This Ratatouille was the perfect vehicle for these little guys.

Chop the tomatoes and layer them in the pan. All of their juices will heat up and coat the layers beneath. Ratatouille is like a savory, Italian, vegetable layer-cake and as for the final layers, add a couple handfuls of sliced Cremini mushrooms and a good dose of fresh herbs (rosemary, mint, basil, oregano, chives)

Once all of your layers are stacked up, simply place a cover over that beast and let it cook away. Once you think everything is cooked to your liking of tenderness, give it all a big stir and let it cook for just a few minutes more and....presto..... Ratatouille.